Installing PHP Extensions with MAMP
Posted 11 years, 20 weeks ago.
This last weekend, I decided to knuckle down and build an OAuth server in PHP. One thing that had kept me from doing it until now was that I didn’t have the required extension installed in my development environment.
My development environment is MAMP (not the PRO version), which I’m running on OS X Mountain Lion. The combination made it a little more difficult to install extensions than I would have liked (though I am a bit of a command line n00b, so I guess there’s that).
So both to assist those who come after me, and also to remind me when I have to go through this again, here’s what I did.
Install Command Line Tools
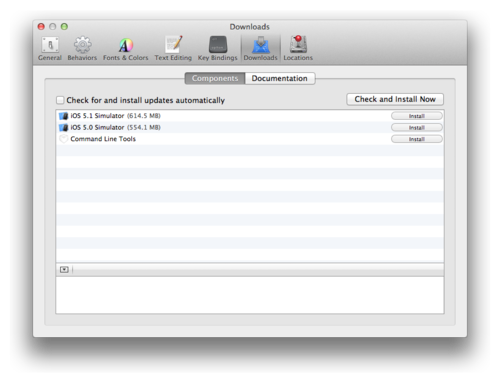
First up we need to install the Command Line Tools that usually come with Xcode. Regardless of whatever that previous sentence will have you believe, you don’t actually require Xcode to install them.
If you have Xcode, installation is as simple as opening up Xcode, going into the Downloads pane of the Preferences, selecting components and installing “Command Line Tools”. It’ll take a couple of minutes or whatever, but then it’s done. BOOM. Close Xcode and move on to the next step.
If you don’t have Xcode, you first need to download the tools from the Downloads for Apple Developers page (you’ll need to register as an Apple Developer if you haven’t already). Find the latest version of Command Line Tools for your version of OS X on that page and download them. Once it’s done, open up the disk image and run the installer package.
Additional Tools
There are a few tools that we need which aren’t included in Apple’s little package. Fortunately, I managed to find a blog post that included a useful script which does all the heavy lifting. I took that and turned it into a shell script that you can run with terminal.
Download the script from GitHub, then unzip it and move it into your home folder. Open terminal and then simply run the following command (you might need to type in an administrator’s password at some stage):
sh ~/cltools.sh
This will download and install all the tools included in the script. Once it’s done Terminal will display “Installation complete.” and throw you a new command prompt.
Once it’s done check the last few lines that have printed to the Terminal window. If you’re seeing a whole lot of “command not found” style errors on screen, you might need to open the script in a text editor and enter each line individually. I had to do this on one of my machines to get things working.
Preparing MAMP
If you use OS X’s built in PHP server, you probably don’t need to go through this next part. If, however, you’re using MAMP, then you’ll need to configure it to be able to install your extensions.
Providing the PHP source
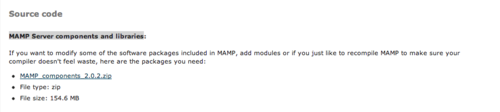
Assuming you’ve already installed MAMP (it has an installer package, so it’s pretty easy), you’ll need to download the MAMP Server components and libraries from the MAMP Downloads page (under the heading “Source code”).
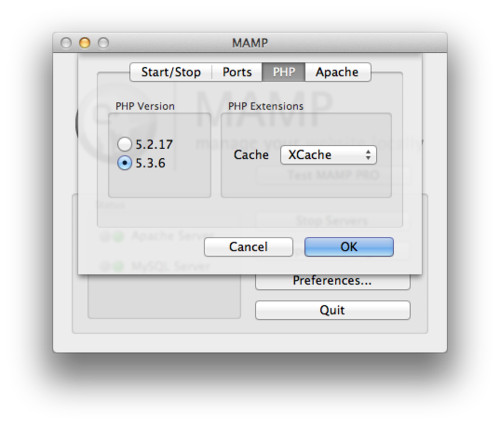
Once this is downloaded, unzip it and find the file for PHP with the version number corresponding to the one you use. If you’re not sure which one you’re using, open the MAMP application, and look at the PHP section in the Preferences pane. Unzip this as well.
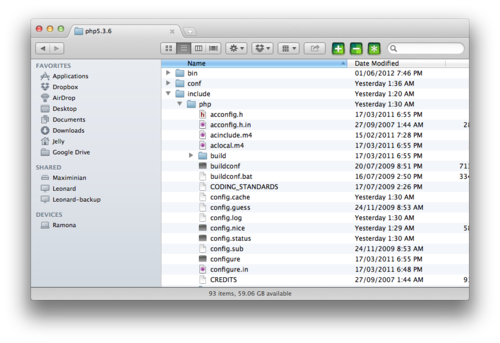
Now we need to find the PHP folder in your MAMP install. It’ll reference the PHP version number selected in the Preferences, and it’s pretty likely that you’ll find it in /Applications/MAMP/bin/php. Open it in Finder and then create a new folder inside called include. Copy the folder we unzipped into here and rename it php. The result should be something like this:
Now go to Terminal and use the following command to navigate to the folder we copied. You might have to adjust it if your MAMP installation or version of PHP is different.
cd /Applications/MAMP/bin/php/php5.3.6/include/php
Then configure it using this command:
./configure
It’ll build and run checks and eventually you’ll get a License and a thank you notice and you’ll get a new command prompt.
Using the correct PHP installation
Now that we have everything in place, we need to use the MAMP installation of PHP rather than the default OS X installation. We can change this pretty easily (again, adjust the path if necessary to that it points to your version of PHP):
echo "export PATH=/Applications/MAMP/bin/php/php5.3.6/bin:$PATH" >> ~/.profile
Now we just need to get Terminal to read in the new path variable.
. ~/.profile
And now we tell pear and pecl where our php.ini file is. You can find this by going to your MAMP installation’s phpInfo page – http://localhost/MAMP/ – and looking at the “Loaded Configuration File”. Then just run these two commands (adjusting depending on where your php.ini is located):
pear config-set php_ini /Applications/MAMP/bin/php/php5.3.6/conf/php.ini
pecl config-set php_ini /Applications/MAMP/bin/php/php5.3.6/conf/php.ini
Install an extension
There are two ways to install an extension: the shortcut and the full version. They both do basically the same thing, but if you have issues with one, try the other.
The Shortcut
Open up Terminal and start by doing a channel update for either PEAR or PECL (in this case, PECL):
pecl channel-update pecl.php.net
Now run the install for your extension.
pecl install uploadprogress
And then add the extension to the php.ini file.
extension=uploadprogress.so
Assuming you get no errors, that’s it. Restart the MAMP servers and away you go!
The Long Way Around
Open up Terminal and browse to whatever directory you want temp files to be located in. In this case, temp in the user’s home folder.
cd ~/temp
Next we’ll download and extract the extension’s source with the following two commands:
wget http://pecl.php.net/get/uploadprogress-1.0.3.1.tgz
tar zxvf uploadprogress-1.0.3.1.tgz
Navigate into the new directory and prepare for compiling.
cd uploadprogress-1.0.3.1
phpize && ./configure -with-php-config=/usr/bin/php-config
Finally, compile and install the extension.
make && make install
And finally, add the extension to the php.ini file.
extension=uploadprogress.so
Restart the MAMP servers and away you go!
Dealing with errors…
If you try installing an extension at this point, you might get an error complaining that the config file is corrupted. If you get that error then simply delete the pear.conf file (it should be located in the same folder as php.ini).
If you get an error saying that autoconf couldn’t be found, then the additional command line tools probably didn’t get installed correctly. Open up the script you downloaded and enter each line individually into Terminal rather than running the script. IF everything seems ok, try installing again.